How to Navigate the Complexities of a Wafer Butterfly Valve Bolt Chart
Navigating the complexities of a Wafer Butterfly Valve Bolt Chart can seem daunting at first. This essential tool is integral to the proper installation, operation, and maintenance of wafer butterfly valves, which are widely used in industrial applications for regulating flow. Understanding this bolt chart not only ensures the correct bolts are used but also contributes significantly towards the overall safety and efficiency of the system. In this blog post, we aim to demystify the complexities of the bolt chart and guide you with practical steps on how to accurately interpret and apply this crucial information. Join us as we delve into the intricacies of the wafer butterfly valve bolt chart, making it an accessible and valuable tool in your professional arsenal.
Introduction
The process of navigating the complexities of a Wafer Butterfly Valve Bolt Chart begins with understanding its fundamental purpose: to provide precise specifications for the bolts needed to securely install and operate wafer butterfly valves. These charts typically list bolt sizes, lengths, and types for various valve sizes and pressure classes, ensuring accurate, safe, and efficient assembly. To effectively use the chart, you need to know the exact size and pressure class of your valve. With this information, locate the corresponding row or column on the chart. The intersection of these parameters will give you the required bolt specifications. It’s essential to follow these specifications strictly to avoid any operational issues or potential safety hazards. Remember, using the wrong bolt can lead to valve malfunction, leakage, or even catastrophic failure of the system. Moreover, always ensure that the bolt material is compatible with the valve and the medium it will control. Some materials may corrode or weaken under certain conditions, compromising the integrity of the entire assembly. Lastly, remember that while the chart provides invaluable guidance, it should be used in conjunction with other resources, such as manufacturer’s instructions and industry standards, to ensure optimal performance and safety. Navigating a Wafer Butterfly Valve Bolt Chart may seem complex at first, but with practice and understanding, it becomes an indispensable tool in the proper installation and maintenance of wafer butterfly valves.
Brief explanation of what a wafer butterfly valve is.
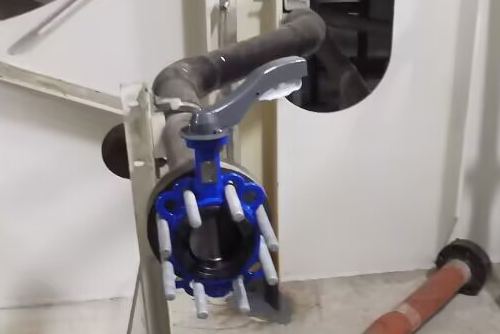
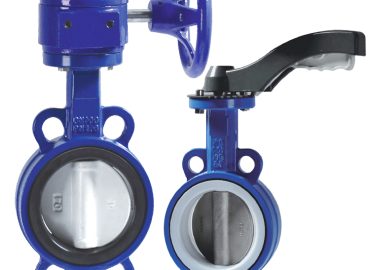
A wafer butterfly valve is a type of flow control device that is typically used in large pipe systems. Named for its thin, wafer-like profile, this valve fits snugly between two pipe flanges and is held in place by bolts that pass through the flanges. The “butterfly” in its name comes from the disc located in the center of the pipe, which rotates to open or close the valve – much like a butterfly flapping its wings. This disc is connected to a handle or actuator on the outside of the valve, allowing for manual or automated control. When the disc is turned so that it’s fully aligned with the flow, the valve is fully open, and when it’s turned perpendicular to the flow, the valve is fully closed. Wafer butterfly valves are popular due to their simplicity, reliability, and cost-effectiveness. They’re used in a variety of applications, including water distribution, chemical processing, and HVAC systems. Despite their simplicity, however, it is crucial to use the correct bolts when installing these valves, as specified by the bolt chart, to ensure proper function and safety.
Importance of understanding the bolt chart for proper use and safety.
Understanding the bolt chart for wafer butterfly valves is crucial for both proper use and safety. The bolt chart provides specific information about the size, type, and length of bolts required for each valve size and pressure class. Using the correct bolts as per the chart ensures a secure fit between the valve and the flanges of the pipe system, which is essential for the efficient operation of the valve. If the wrong bolts are used, it can lead to issues such as leaks or valve malfunction, affecting the overall performance of the system. More critically, using incorrect bolts can pose significant safety risks. For instance, a bolt that is too short may not provide a secure fit, while a bolt that is too long might protrude into the pipeline, potentially causing blockages or damaging the valve disc. Similarly, using bolts made of incompatible materials can lead to corrosion or weakening of the assembly under certain conditions. Hence, understanding and correctly interpreting the bolt chart is fundamental to the safe and effective installation and operation of wafer butterfly valves.
Understanding a Wafer Butterfly Valve
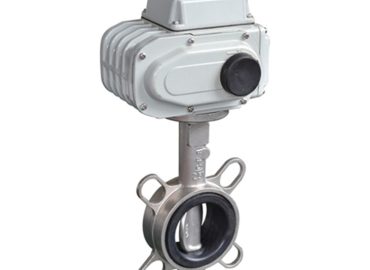
A wafer butterfly valve is a specific type of valve commonly used in various industrial applications, including water distribution, chemical processing, and HVAC systems. Its design consists of a circular disc or “butterfly” that rotates around an axis that is perpendicular to the direction of the flow within the pipe system. This rotation is controlled by a handle or actuator outside the valve, allowing for manual or automated operation. When the disc is fully aligned with the flow, the valve is fully open, and when it’s turned 90 degrees perpendicular to the flow, the valve is fully closed. The term “wafer” refers to the valve’s thin, flat design, which allows it to fit snugly between two flanges in a pipe system. These flanges are then secured with bolts that pass through the flanges and the wafer butterfly valve. This design makes the wafer butterfly valve compact, cost-effective, and easy to install and maintain. However, it is crucial to use the correct bolts, as specified by the bolt chart, to ensure a secure fit and proper operation. Using incorrect bolts can lead to operational issues, potential safety hazards, and reduced longevity of the valve. Understanding the workings of a wafer butterfly valve and the importance of proper installation and maintenance is essential for ensuring the efficiency and safety of the systems in which they are used.
Detailed explanation of a wafer butterfly valve, its components and its uses.
A wafer butterfly valve is a specialized valve used for controlling the flow of liquids or gases in a pipeline. It consists of several key components. The body of the valve is thin and flat, resembling a wafer, which allows it to fit between two pipe flanges. The disc, often referred to as the ‘butterfly’, is positioned in the center of the pipe and is connected to a rod that passes through the valve to a handle or actuator on the outside. This design allows the disc to pivot – much like a butterfly flapping its wings – when the handle or actuator is turned. When the disc is aligned parallel to the flow, the valve is fully open, allowing maximum flow. Conversely, when the disc is turned to a position perpendicular to the flow, the valve is fully closed, stopping the flow entirely.
Wafer butterfly valves are widely used due to their simplicity, durability, and cost-effectiveness. They are suitable for large diameter pipes and are commonly found in various industries including water treatment, power generation, and chemical processing. They also serve essential roles in HVAC systems for regulating airflow, and in fire protection systems due to their ability to quickly stop the flow of water when needed. However, proper installation is crucial, and this includes using the correct bolts as specified by the bolt chart, to ensure both optimal performance and safety.
Importance of each component and their role in the overall functioning of the valve.
Each component of a wafer butterfly valve plays a crucial role in its overall functioning. The body of the valve, designed like a thin wafer, is what allows it to be sandwiched between two flanges in a pipe system, offering a compact and cost-effective solution for flow control. The disc, which gives the valve its ‘butterfly’ name, is the primary component that controls the flow. When rotated parallel to the flow of the fluid or gas, it allows maximum flow through the pipeline. Conversely, when turned perpendicular to the flow, it acts as a barrier, halting all flow. This disc is attached to a rod, which extends outside the valve and connects to a handle or actuator. The handle or actuator is what operators use to control the position of the disc, and therefore the flow. In some systems, this actuator may be automated, allowing for precise control even from a distance. Another essential component are the bolts used to secure the valve between the flanges. Using the correct size and type of bolt, as specified in the bolt chart, is critical to ensure a secure fit and prevent leaks or malfunctions. Overall, each component of a wafer butterfly valve works together to provide a reliable and efficient method of controlling flow within a pipeline.
The Role of Bolts in a Wafer Butterfly Valve
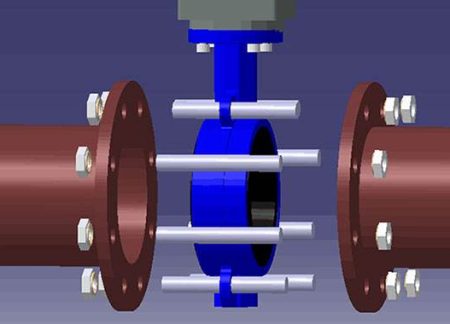
Bolts play an integral role in the functionality and security of a wafer butterfly valve. They are responsible for securing the valve between two flanges within a pipe system, ensuring a tight seal and preventing any leakage. The bolts pass through holes in the flanges and the wafer butterfly valve, binding them together to create a secure fit. This is particularly important as the wafer butterfly valve’s design does not include any attached flanges of its own. Instead, it relies on the tension created by the tightened bolts to maintain its position within the pipeline, which allows it to control the flow of fluid or gas effectively. The size, type, and number of bolts used will depend on the specific requirements of the application, including the pressure and temperature conditions, as well as the diameter of the pipeline. Incorrectly sized or improperly installed bolts can lead to malfunctions, leaks, or even catastrophic failure of the valve. Therefore, it is crucial to refer to the bolt chart provided by the manufacturer to ensure that the correct bolts are used and installed correctly. Furthermore, the bolts must be regularly checked and maintained as part of a routine maintenance schedule to ensure their ongoing effectiveness and the overall safety of the valve and the pipeline system.
Explanation of the role bolts play in securing and operating a wafer butterfly valve.
Bolts are crucial in the installation, securing, and operation of a wafer butterfly valve. Given the unique design of the wafer butterfly valve, which is thin and flat, it is sandwiched between two pipe flanges. The bolts are used to secure the valve in place by passing through the holes in each flange and the wafer butterfly valve itself. This ensures a tight seal and maintains the valve’s position within the pipeline. The secure fit of the bolts is essential for the efficient operation of the valve as it controls the flow of fluid or gas. If the bolts are not properly installed or if they are the wrong size, it could lead to leaks or even a complete malfunction of the valve. The number and size of the bolts required vary depending on the specific application, including factors such as pressure and temperature conditions, and the diameter of the pipeline. Therefore, it’s important to refer to the manufacturer’s bolt chart to ensure the correct bolts are used and installed correctly. In summary, bolts play a vital role in the secure installation and effective operation of a wafer butterfly valve.
Discussion on different types of bolts used and why it’s essential to use the correct ones.
Bolts are a critical component in many mechanical and structural applications, including the installation and operation of a wafer butterfly valve. There are different types of bolts available, each designed for specific uses. Commonly used types include hex bolts, carriage bolts, flange bolts, eye bolts, and U-bolts, among others. Hex bolts, with their six-sided heads, are often used in construction and repair applications where a strong joint is needed. Carriage bolts have a smooth, rounded head for a finished look and are typically used in wood applications. Flange bolts have an integrated flange at the base of the head which acts as a washer to distribute the load, making them ideal for tight spaces. Eye bolts are designed for anchoring and lifting heavy loads, while U-bolts are used to provide a clamping force around a pipe or other cylindrical object. The type of bolt used in a wafer butterfly valve will depend on various factors such as the material of the valve and the pipeline, the pressure and temperature conditions, and the diameter of the pipeline. Using the correct bolts is essential as incorrect bolts could compromise the seal, leading to leaks or even a complete malfunction of the valve. For instance, if a bolt is too small, it may not provide sufficient tension to maintain a tight seal. Conversely, a bolt that is too large may strain or damage the valve or flanges. Therefore, it’s important to refer to the manufacturer’s bolt chart to ensure the correct bolts are used.
Introduction to the Wafer Butterfly Valve Bolt Chart
The Wafer Butterfly Valve Bolt Chart serves as a critical guide for users to select the appropriate bolts during the installation and maintenance of a wafer butterfly valve. This chart typically details the specific bolt size, type, and quantity required for each size of the valve, ensuring optimal performance and safety. The information in the chart is based on various factors such as the diameter of the pipeline, the material of the valve and pipeline, and the pressure and temperature conditions within the system. Given the crucial role of bolts in securing the wafer butterfly valve between the pipe flanges and maintaining a tight seal, it’s essential to follow the guidelines laid out in the chart. Using incorrect bolts may lead to issues like leaks, malfunctions, or even catastrophic failure of the valve. Therefore, the Wafer Butterfly Valve Bolt Chart plays a pivotal role in ensuring the correct installation and ongoing operation of the valve. It’s always recommended to refer to this chart before installation or maintenance tasks, and to consult with valve manufacturers or professionals if any uncertainty arises.
Explanation of what a bolt chart is and why it’s useful.
A bolt chart is a comprehensive reference guide that provides crucial information about bolts, including their dimensions, sizes, thread counts, and other key specifications. It’s essentially a tool that helps users identify and select the correct bolts for various applications. The chart typically includes details such as the diameter, length, thread pitch (the distance between threads), and the standard to which the bolt conforms (like ANSI or ISO). This information is critical in ensuring the bolt fits properly and performs optimally in its intended application. For instance, in the context of a wafer butterfly valve, the bolt chart can help determine the right size and type of bolt required to secure the valve properly within a pipeline system. Using the wrong bolt could compromise the seal, lead to leaks, or even result in a complete malfunction of the valve. Therefore, a bolt chart is an indispensable tool in engineering and construction fields, helping to ensure safety, efficiency, and the longevity of mechanical systems.
Overview of the information typically found on a bolt chart.
A bolt chart typically contains a wealth of information designed to help users identify the correct bolts for their specific needs. First, it will list the various sizes of bolts, often ranging from small diameters suitable for delicate applications to larger ones used in heavy-duty construction. These sizes are usually represented in both metric and imperial units. Next, the chart may provide details about the thread count or pitch, which refers to the number of threads per inch or the distance between threads in metric measurements. This specification is crucial for ensuring the bolt will thread correctly into a matching nut or hole. Additionally, the chart might include the bolt’s length, which is important in applications where the bolt must pass through multiple components or a certain thickness of material. Other common details found on a bolt chart can include the bolt’s head type (e.g., hexagonal, square, or round), the standard to which the bolt conforms (such as ANSI, ISO, or DIN), and the material from which the bolt is made. This last detail can be particularly important in applications where the bolt may be exposed to corrosive substances or extreme temperatures. By providing all this information in an easy-to-read format, a bolt chart serves as an invaluable tool for anyone working with bolts.
Navigating the Bolt Chart
Navigating a bolt chart requires an understanding of the key elements that it contains, and how they relate to your specific application. Starting from the top, the chart usually provides a list of bolt sizes, which can be expressed in either metric (millimeters) or imperial (inches) measurements. These sizes typically refer to the diameter of the bolt’s thread or shank. Next, you’ll find information about the thread pitch or count, which indicates the spacing of the threads – essential for ensuring compatibility with corresponding nuts or threaded holes. The chart may also specify the length of the bolt, which is important when the bolt needs to pass through certain thicknesses of material or multiple components. Some charts also include details about the type of bolt head (such as hexagonal or square), which affects the tools needed for installation. Additionally, the chart might specify the standard to which the bolt conforms (like ANSI, ISO, or DIN), which can impact its dimensions and compatibility with other components. Lastly, the chart could provide details about the bolt’s material, such as whether it’s made of stainless steel, carbon steel, or another substance. This information helps users choose bolts that can withstand specific environmental conditions, such as exposure to corrosive chemicals or high temperatures. By understanding these different elements, users can successfully navigate a bolt chart to select the right bolt for their needs, ensuring optimal performance and safety in their application.
Step-by-step guide on how to read and interpret the bolt chart.
Reading and interpreting a bolt chart involves several key steps. First, identify the bolt size you need for your application. This is typically defined by the diameter of the bolt’s thread or shank and can be listed in either metric (millimeters) or imperial (inches) units on the chart. Next, examine the thread pitch or count, which indicates the spacing of the threads. This needs to match the corresponding nut or threaded hole to ensure proper fit and function. The third step involves assessing the bolt’s length, which is crucial if the bolt needs to pass through certain thicknesses of material or multiple components. After that, look at the type of bolt head – whether it’s hexagonal, square, or another shape, as this will determine the tools required for installation. The following step is to check the standard to which the bolt conforms (like ANSI, ISO, or DIN). This information can impact its dimensions and compatibility with other components. Finally, consider the material of the bolt, which might be stainless steel, carbon steel, or another substance. This is particularly important in applications where the bolt may face certain environmental conditions, such as exposure to corrosive chemicals or high temperatures. By following these steps meticulously, you can effectively interpret a bolt chart and select the right bolt for your specific needs.
Tips on identifying the correct bolt size, type and quantity needed for a specific valve.
Identifying the correct bolt size, type, and quantity for a specific valve requires careful consideration of several factors. First, consult the valve manufacturer’s specifications or installation guide, as this will often provide detailed information on the required bolt size, type, and quantity. The bolt size typically correlates with the valve size, and it is crucial to ensure that the diameter and length of the bolt are suitable for the valve’s flange holes. The type of bolt, such as hex head or socket cap, is also important, as different types require different tools for installation. Additionally, consider the material of the bolt. For instance, stainless steel bolts might be necessary for valves used in corrosive environments, while carbon steel might suffice for less demanding applications. As for the quantity, count the number of bolt holes on the valve flange — this should equal the number of bolts needed. However, it’s often a good idea to order a few extra bolts to account for any that may be lost or damaged during installation. Lastly, always ensure that the selected bolts comply with any relevant industry standards or regulations. By following these tips, you can correctly identify the bolt size, type, and quantity needed for a specific valve, ensuring a secure and reliable installation.
Practical Application of the Bolt Chart
The bolt chart finds its practical application in a variety of sectors including construction, automotive, aerospace, and manufacturing, among others. It serves as a crucial reference tool for engineers, mechanics, and builders who need to select the correct bolts for their specific applications. For instance, in the construction industry, a contractor might use a bolt chart to determine the appropriate size, type, and material of bolt required for a particular building project. This could range from securing structural steel beams, attaching wall panels, or installing heavy machinery. Similarly, in the automotive or aerospace sector, technicians would refer to a bolt chart to ensure they’re using the right bolts during assembly or maintenance tasks – whether it’s securing engine components, attaching body panels, or fastening interior elements. Additionally, manufacturers of machinery and equipment often rely on bolt charts to specify the correct bolts for assembling their products, ensuring they meet safety standards and perform optimally. Furthermore, bolt charts can also be invaluable in educational settings, where they can assist students in understanding the various types of bolts available and their appropriate uses. By providing essential details such as bolt sizes, thread pitch or count, length, head type, standard, and material, a bolt chart enables precise selection and application of bolts, thereby ensuring the safety, reliability, and efficiency of various projects and applications.
Real-life examples of how to use the bolt chart when installing, maintaining or repairing a wafer butterfly valve.
A bolt chart is an essential tool when installing, maintaining, or repairing a wafer butterfly valve in real-world applications. For instance, suppose you are an engineer working in a water treatment plant and you need to install a new wafer butterfly valve in one of the pipelines. A bolt chart would be crucial in this scenario for determining the correct size, type, and number of bolts needed to securely fasten the valve between the flanges of the pipe. The chart would provide the necessary information, such as the diameter and length of the bolts appropriate for the valve’s size and the type of bolt head suitable for the tools at hand. Similarly, if you are a mechanic tasked with the maintenance or repair of a wafer butterfly valve in a HVAC system, a bolt chart would guide you in selecting the right replacement bolts in case the existing ones are corroded or damaged. It would allow you to match the specifications of the original bolts, ensuring that the repaired valve functions optimally and safely. Furthermore, in industries like chemical or food processing where the material of the bolt is crucial due to exposure to corrosive substances or strict hygiene requirements, a bolt chart can help identify the appropriate bolt material, such as stainless steel or brass. Hence, a bolt chart proves invaluable in real-life scenarios involving the installation, maintenance, and repair of wafer butterfly valves.
Common mistakes to avoid when using the bolt chart.
When using a bolt chart, there are several common mistakes that should be avoided to ensure the correct selection and application of bolts. One significant error is misreading or misunderstanding the measurements provided in the chart. For instance, confusing metric and imperial measurements can lead to selecting the wrong size bolts. Always ensure you are referencing the correct measurement system for your application. Another common mistake is overlooking the thread count or pitch. This detail is crucial as it determines how the bolt will fit into the threaded hole or nut. Ignoring the material specification is another error that can have serious implications, particularly in environments where the bolt may be exposed to corrosive elements or extreme temperatures. Using a bolt made from an unsuitable material can lead to premature failure. Also, not paying attention to the type of bolt head can lead to problems during installation, as different bolt heads require different tools. Lastly, a common blunder is not considering the bolt grade or strength. The grade of a bolt determines its load-bearing capacity, and using a lower grade bolt than required can risk the integrity of the whole assembly. By avoiding these common pitfalls, you can make more effective use of a bolt chart and ensure the success of your project.
Additional Resources and Tools
In addition to a bolt chart, there are several other resources and tools that can be beneficial in various applications. For example, a torque wrench is an essential tool to ensure that bolts are tightened to the correct degree, preventing both under-tightening and over-tightening. Similarly, thread gauges can be used to measure the pitch or lead of screw threads, ensuring compatibility between the bolt and its corresponding nut or threaded hole. Also, a micrometer or a caliper can be used to measure the diameter and length of a bolt accurately. These measurements can then be cross-referenced with a bolt chart for accurate bolt selection. Furthermore, material data sheets can provide detailed information about the properties of different bolt materials, helping you choose the right bolt for specific environmental conditions. Online resources, such as technical forums and instructional videos, can also be valuable for learning and troubleshooting. Software tools like CAD (Computer Aided Design) programs can help visualize how a particular bolt will fit into your design. Manufacturer catalogs are another helpful resource, as they provide specific product details and often include proprietary bolt charts tailored to their product range. Finally, training courses and workshops, whether online or in-person, can provide hands-on experience and expert guidance on using these resources and tools effectively. By leveraging these additional resources and tools, you can enhance your understanding, streamline your work process, and increase the likelihood of project success.
Suggestions for further reading and resources to deepen understanding of wafer butterfly valves and bolt charts.
To further deepen your understanding about marine butterfly valves and bolt charts, there are several resources you can refer to. Books such as “Valve Handbook” by Philip L. Skousen and “Piping and Valve Engineering Handbook” by Boyan Guo provide comprehensive insights into the world of industrial valves, including wafer butterfly valves. They cover topics like design principles, installation techniques, maintenance procedures, and troubleshooting strategies. Websites of valve manufacturers often have extensive technical documentation, including detailed product catalogs, installation manuals, and maintenance guides, which can be very helpful. Online platforms like Coursera and Udemy offer courses in mechanical engineering and piping systems where you can learn more about the practical aspects of using valves and bolts. For a deeper dive into bolt charts specifically, the “Machinery’s Handbook” is an invaluable reference. It provides a wealth of information on bolt sizes, types, grades, and materials, along with detailed explanations on how to interpret and use bolt charts. Industry-specific forums and communities such as Eng-Tips Forums and the American Society of Mechanical Engineers (ASME) can also be great places to ask questions and share knowledge with professionals and experts in the field.
Recommendations for tools that can aid in applying the bolt chart information effectively.
To effectively apply the information from a bolt chart, several tools can be of great assistance. A digital caliper is an essential tool for accurately measuring bolt dimensions such as diameter and length. This will help ensure you select the correct bolt size based on your bolt chart. A thread gauge is another indispensable tool that can help identify thread pitch and type, which are crucial factors in selecting the right bolt. For tightening bolts, a torque wrench is recommended, as it allows you to apply a specific amount of force, ensuring the bolt is neither too loose nor too tight. If you’re dealing with metric and imperial measurements, having a conversion calculator or app can be handy to quickly switch between the two systems. Software tools like CAD (Computer-Aided Design) can also be beneficial. They allow you to virtually model and test your assembly, giving you a clear idea of what type of bolt to use. Finally, materials reference guides can provide valuable insights into the properties of different bolt materials, helping you choose the right bolt for specific environmental conditions. By using these tools in conjunction with a bolt chart, you can make more informed decisions and ensure the success of your project.
Conclusion
In conclusion, understanding and navigating the complexities of a wafer butterfly valve bolt chart can indeed seem like a daunting task. However, with the right approach and resources, it becomes a manageable and even intriguing process. The first step is to familiarize yourself with the basics of a bolt chart — understanding the various parameters such as bolt size, type, material, and torque values. Remember, each parameter plays a critical role in determining the performance and suitability of a bolt for a specific application.
Having the correct tools at hand is another key factor. Tools such as a digital caliper, thread gauge, torque wrench, and CAD software, can significantly simplify the process and enhance precision. It’s also beneficial to cross-reference your measurements with materials reference guides to ensure that you’re choosing bolts with the right material properties for your specific environment.
Further, don’t underestimate the power of continuous learning. Books, online courses, forums, and workshops can provide deeper insights into the world of wafer butterfly valves and bolt charts. They can help you understand intricate details, learn from the experiences of others, and stay updated on industry trends and best practices.
Lastly, remember that mastering the art of reading a bolt chart is not an overnight process. It requires patience, practice, and a lot of trial and error. Over time, you’ll develop a keen eye for detail and a sixth sense for selecting the perfect bolt for any given task. So, don’t be disheartened by initial challenges. Keep exploring, keep learning, and soon, you’ll find that the seemingly complex world of wafer butterfly valve bolt charts is not so intimidating after all.
In the end, the goal is to ensure the efficient and safe operation of your wafer butterfly valves, and a thorough understanding of bolt charts is a significant step towards achieving this. Armed with knowledge, the right tools, and a commitment to continuous learning, you’ll be well-equipped to navigate the complexities of wafer butterfly valve bolt charts and excel in your projects.
Recap of the key points covered in the blog.
In this blog post, we delved into the complexities of wafer butterfly valve bolt charts, providing a comprehensive guide on how to navigate them effectively. We started by outlining the importance of understanding the various parameters on a bolt chart, including bolt size, type, material, and torque values, emphasizing that each plays a critical role in determining the bolt’s performance and suitability for a specific application. We then highlighted the significance of utilizing the right tools, such as a digital caliper, thread gauge, torque wrench, and CAD software, to enhance precision and simplify the process. The value of continuous learning was also emphasized, with recommendations for books, online courses, forums, and workshops that can provide deeper insights into the subject matter. Lastly, we reinforced the notion that mastering bolt charts requires patience, practice, and a willingness to learn from trial and error. The overall goal is to ensure the efficient and safe operation of your wafer butterfly valves, and a thorough understanding of bolt charts is a significant step towards achieving this.
Encouragement for readers to invest time in understanding the bolt chart to ensure safe and efficient use of wafer butterfly valves.
Understanding a wafer butterfly valve bolt chart may initially seem like a complex task, but investing your time in comprehending it is truly worthwhile. This understanding is critical for ensuring the safe and efficient use of your valves. Mastering the bolt chart allows you to make informed decisions that can significantly improve the performance and lifespan of your valves. In the world of engineering, attention to detail is key, and your dedication to learning these details will undoubtedly enhance your operational efficiency. So, take up the challenge, dive into the learning process, and rest assured that your commitment to knowledge will result in a safer and more productive workspace.